Undertime Deduction Calculator
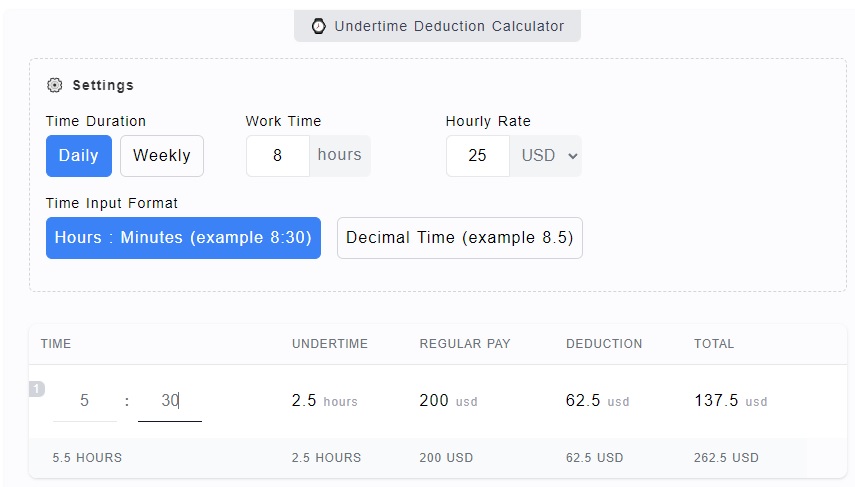
The Undertime Deduction Calculator is a tool for both employees and employers to calculate the salary deduction based on the employee's undertimes. You just need to specify the required working time for the employee - 8 hours per day, 40 hours per week or 160 hours per month. Then you can enter the worked time on the calculator and the salary deduction will be calculated accordingly.
How to Use the Undertime Deduction Calculator

The very first thing you need to do is either you are calculating deduction for a daily, weekly or monthly salary deduction based on undertimes. The calculator only accommodates the totaled time, say for example, an employee only worked 7:45 hours the past day and 6:30 hours today. If you need to enter something like 8:00AM to 5:00, then check out this Timesheet Calculator.
The calculator is separated in only two parts - the settings and the time entries table. To elaborate it's step by step usage, check this out:
- Step 1
On the
Settingspart, there's Time Duration, Work Time, Hourly Rate and Time Input Format. Each has its functionality but let's focus for now on work time and time input format. The Work Time represents the required time where the employee needs to work. For example, 8 hours, 40 hours or 160 hours. - Step 2
Still on the settings portion, determine whether you want to input a default time (example:
8:30 hours) or a decimal time format (example:8.5 hours). The default is theHours:Minutestime format. - Step 3
The next step is to actually add the time entries. Say a worker worked - 7:30 hours on Monday, 5:45 on Tuesday, 9:00 on Wednesday and so on. This is considering that your required time is 8 hours per day. It's the same logic that applies to weekly or monthly time, just change the required work time. Say for example, you have changed the
Work Timeto 40 hours. Then, you can enter 35 hours, 45 hours and 39 hours and so on, on the time entries table. You can add more rows by clicking the+Add Rowbutton. You can delete them as well by clicking thexremove icon. - Step 4
The last step is to click on the
Calculatebutton to get your results. Below the table are the totality of the results like total time, undertimes, regular pays, deductions and total pay. By default, the monetary unit used are all in USD.
Undertime Deduction Calculator Options and Inputs
As previously mentioned, the calculator is separated into two (2) parts - the settings and time entries. On the settings part, there are four (4) options you can personalize and on the time entries, there are two (2) default input fields. Let's have a look on each one of them.
Time Duration
The Time Duration is a representation whether you are
calculating a daily or weekly undertime deduction. Clicking the
Daily or Weekly button will change the
default Work Time to 8 hours and 40 hours accordingly.
Work Time
This is probably on the most important part of the calculator, the
Work Time. It is the required work time by the employee.
You can add either 8 hours, if it's a daily undertime calculation. You
can also choose to add 40 hours if it's weekly or 160 hours if this is
a monthly basis.
Hourly Rate
The Hourly Rate is the basic salary of the employee on an hourly basis. This has a default of 25 dollars per hour. We have used dollar sign here but it's just a representation, this could be your country's currency. There's no currency exchange being done here so there's no conversion involved.
Time Input Format
The Time Input Format will determine the type of time you can enter on the time input fields - a standard time format or a decimal time format. The usual time format is like this - 9:45 or 8:30. While the decimal time format is 9.75 or 8.5.
Time Input
The Time Input is where you need to enter your time entries.
Say you want to know the overtime pay for 9:45 hours. Just enter this
value on the calculator given that you have chosen the
Hours: Minutes time input format.
Calculate and Add Row Buttons
The Calculate button is the trigger to start the
calculation where the results are displayed at the bottom part of the
time table. The +Add Row Button button is used to add
more time entry row. You can add as many as you want and you can
delete them by clicking on the x icon.
See also: 📅 Timesheet Calculator
